
It’s our day for the Sew & Stitch Embroidery Blog Tour, celebrating Alyssa Thomas’s brand new book release. The lovely and talented designer behind Penguin & Fish has put together a gorgeous book full of fun embroidery projects. She’s here today with a special tutorial to keep you stitching! For our take on the book, including a sample project, check out yesterday’s post:).
Take it away, Alyssa!
– – – – – – – – – – – – – – – – – – – – – –
Do you have a bunch of fun fabric scraps that you’ve been saving for a “someday” project? Well, we’ve got a great idea for you! Using fabric scraps, Pellon® 805 Wonder-Under® Fusible Web, and embroidery floss, you can create beautiful Patchwork Collage Wall Art. We used the same technique for the “Bird-in-Ferns” Patchwork Tote in our new book Sew & Stitch Embroidery.
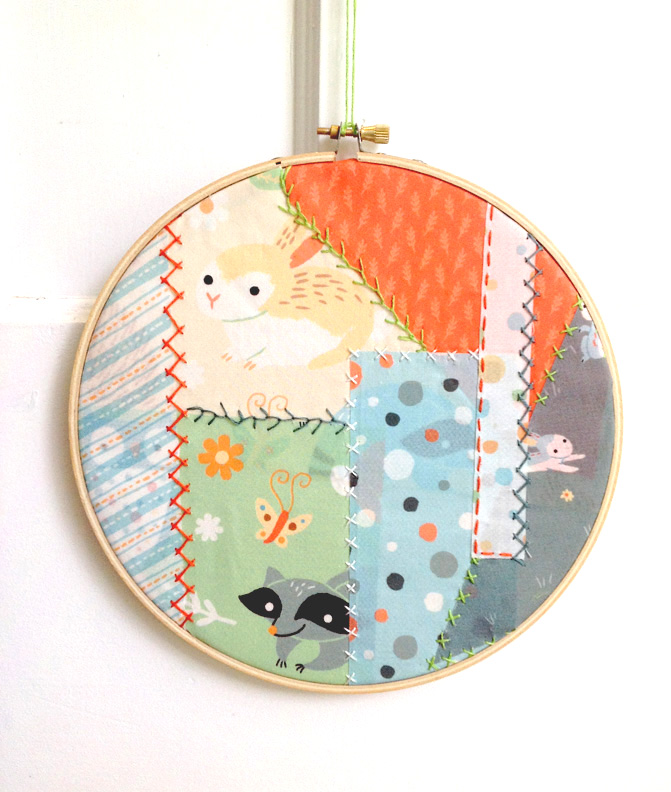
Patchwork Collage Wall Art using Pellon® 805 Wonder-Under®
Materials
— muslin or white scrap fabric at least 10’’ x 10’’
— fabric scraps in various colors and patterns
— Pellon® 805 Wonder-Under® Fusible Web
— 8” embroidery hoop (used for embroidering and in the final wall art)
— embroidery floss in the colors of your choice
Supplies
— water soluble marking pen, or regular old pencil
— rotary fabric cutter
— scissors
— quilting ruler or other straight edge
— self-healing cutting mat
— iron and ironing board
— embroidery needle
— hot glue gun and glue

Directions:
1. Trace the inside circle of the embroidery hoop onto the center of your muslin square. This will be the area where you design your patchwork collage. Set aside.
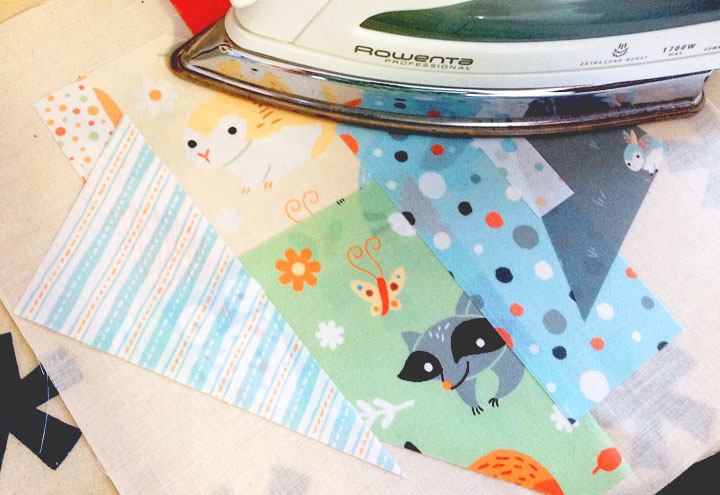
2. Cut the Wonder-Under® into pieces that are about ¼” smaller around all the edges than each of the fabric scraps. Following manufacturer’s instructions, fuse one side to the wrong side of the fabric scraps, centering the adhesive on the scrap. (Iron carefully, as getting the fusible adhesive on the iron could damage it.)
3. Remove the remaining paper backing from the Wonder-Under® pieces attached to the fabric scraps. Trim the fabric edges so they are flush to the edges of the Wonder-Under®. Slice through the fabric pieces at different angles to create various shapes.

4. Lay the muslin with the circle onto the ironing board or other ironable surface. Place the fabric scraps (fabric side up) onto the muslin on top of the drawn circle. Lay out the pieces as desired, making sure to overlap the edges of the circle by at least 1/2’’. Have fun playing with different layouts! When you have a patchwork collage that you like, follow the Wonder-Under® instructions to fuse the fabric collage to the muslin.
5. Using the embroidery floss and needle, embellish the patchwork collage with decorative stitches, stitching through all the layers of fabric. We stitched along every collaged fabric edge with decorative stitches, including feather stitch, herringbone stitch, running stitch, and cross stitch.


6. Place the finished patchwork collage snugly in the embroidery hoop. Trim the edges about ½” from the edge of the embroidery hoop. Using a hot glue gun, glue the edge to the inside of the hoop.


7. Hang your fabulous Patchwork Collage Wall Art, and enjoy!
 [Pictured with Bird-In-Ferns Patchwork Tote from Sew & Stitch Embroidery (pg. 106), by Alyssa Thomas.]
Don’t forget to follow along with the rest of the blog tour! We’re excited to see new tutorials, new takes on projects from the book, and much more!
Penguin & Fish Blog Tour:
Tuesday, Oct. 8 – Mr. X Stitch
Wednesday, Oct. 9 – Pellon
Thursday, Oct. 10 – While She Naps
Friday, Oct. 11 – The Last Piece
Saturday, Oct. 12 – Feeling Stitchy
Monday, Oct. 14 – Wild Olive
Tuesday, Oct. 15 – Bad Ass Quilters Society
Wednesday, Oct. 16 – Spoonflower
Thursday, Oct. 17 – Sew Mama Sew
Friday, Oct. 18 – Skunkboy
Saturday, Oct. 19 – Meet Me at Mikes
Monday, Oct. 21 – Quilt Dad
Tuesday, Oct. 22 – Follow the White Bunny
Wednesday, Oct. 23 – Sarah Jane Studios
– – – – – – – – – – – – – – – – – – – – – – – – – – – – – – – –
About the Author: (from Penguin & Fish)
 Alyssa Thomas is an illustrator, designer, and artist. As a child, Alyssa would make everything from beaded bracelets to large papier maché masks and then barter with her brothers at the “trading post” outside her bedroom door. Alyssa earned a Bachelor of Fine Arts degree in graphic design from the Minneapolis College of Art & Design in 2002. She has worked as a product designer for the children’s apparel and stationary industries and illustrated the children’s picture book, No Monster Here. Alyssa started Penguin & Fish in 2004 as a hobby to create lovely and quirky hand embroidery patterns, embroidery kits, sewing patterns, and artful plush. Today, Penguin & Fish’s products can be found in quilting, sewing, gift and children’s stores worldwide.
Find Alyssa Online:
Website | Blog | Facebook | Twitter | Instagram | Pinterest | Etsy | Flickr | Google+ | Youtube

Beautiful.thanks to the blog and allysa